As dog owners we love nothing more than a new treat or toy to give our dog. They are an integral part of our family; providing us with love, fun and loyalty. It’s nice to give them something back, so don’t miss this fun DIY opportunity to build a raised dog bowl stand.
John, from All Things Dogs, has put together a simple one-hour project, using some scrap pieces of wood or reclaimed pallets, so you can build your beloved canine a new feeding station in record breaking time!
Grab something nice to drink, turn up the music and get ready to tackle this fun DIY dog bowl stand project.
Get Your Materials and Tools
To start with you will need to get some DIY materials:
- Three reclaimed pallets
- One dog bowl
- One pack of 40 oval nails
When you have sourced your reclaimed pallets, make sure that they are safe to use with pets. Normally pallets are branded with a stamp to identify which chemicals have been used to treat the pallet. Any pallet which has the stamp MB (i.e. methyl bromide) don’t use – it’s a toxic chemical.
Once you have the materials ready, it’s time to dust your tools off and get them ready for some DIY. You will need:
- Hammer
- Square
- Tape Measure
- Pencil
Prepare the Pallet
The first thing you will need to do is prepare your reclaimed pallets. To start with, using a pry bar, remove the top boards from the pallet. For the project you will need around 12 planks in total.
Once you have removed the planks, make sure you remove the nails and that the wood is safe to use (i.e. not rotten or treated with methyl bromide). Don’t stop until you’ve got 12 planks ready.
Cut the Planks
Take six of the prepared planks and cut them to the following sizes:
- Two planks at 14”
- Four planks at 12”
To make sure the planks are cut properly, measure the length using a tape measure, draw a cut line using a carpenter’s square and then saw along the line using a sharp hand saw.
Once finished give the sawn edges a quick sand to make them smooth.
Repeat the process again, this time cutting five new planks to 15” – keep these planks aside as they will be required again at the end.

Build the Stand
- Take the initial six planks which you cut, now take the four planks measuring 12” place two parallel against another two and nail one into the other (this will double the width of the plank).
- Finally take the remaining two planks measuring 14” and nail them into the double width 12” planks to create a square.
- Take your five planks and dry fit them to the box you have just built (to make sure they fit – you should have a nice overhang).
- Nail the five planks down into the stand using oval nails.
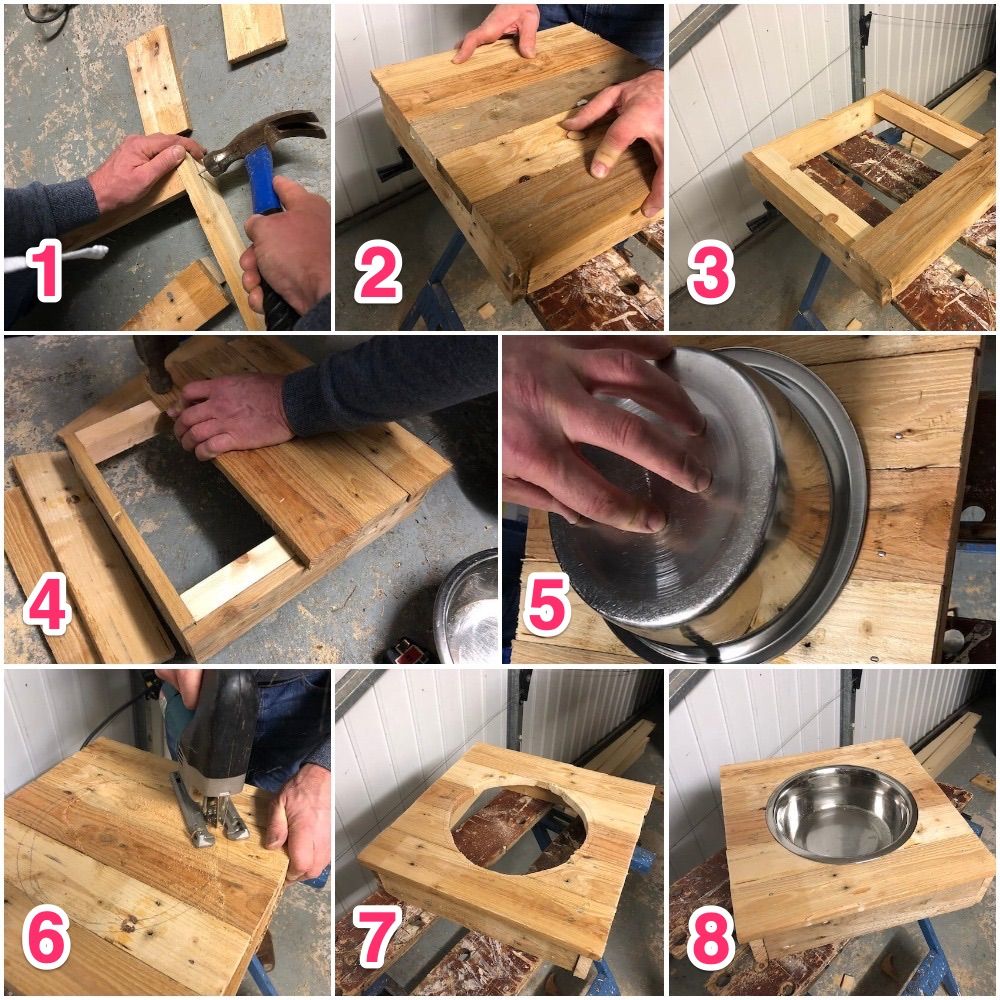
- Place your dog bowl upside down onto the planks and draw around the bowl using a pencil. Remove the center piece of wood from the stand using a jigsaw.
- Sand down the sawn edges and your stand is ready!
Your DIY dog food stand has now been built! You can decorate it or paint it and add some finishing touches; just make sure whatever paint you use is nontoxic and pet friendly.